So a lot of time has past, and my good intensions of writing a regular BLOG have been met with challenges. However, fear not... I have timely thoughts and information to pass along regarding two important engine compartment challenges. 
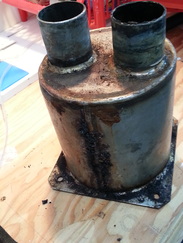
Part One .... the new waterlift muffler. As all 36T owners know the space for the water lift muffler is challenging. The original Stainless muffler is 6 inches high, 6 inches in diameter and has a 6.6 inch base and is held in place by 4 screws that require a little love from an impact driver to remove. The inlet and outlet are both 2 inch. Those are the facts.... Below you can see the offending old muffler on my tool bench ![]() Another factoid... no one seems to stock anything remotely similar. But, do not despair ..... all is not lost! If you do a little digging you will find that CenTek actually makes a lovely fibreglass product that will in fact, fit perfectly (with a couple of small modifications... more on that in a minute). It is a CenteK VernaLift muffler (Go to Centekindustries.com choose the wet exhaust tab and then VernaLIft Top in/Top out). The part number is 1500276. You can order the part from Trotac or you can order it direct from Centek (229-228-7653) in Thomasville Georgia -- Its $146.25 US or approx $7000 CDN. Below you can see the Centek is a bit taller (9 Inches high) but otherwise almost identical 
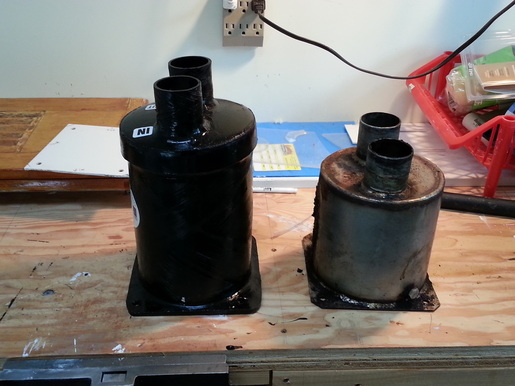
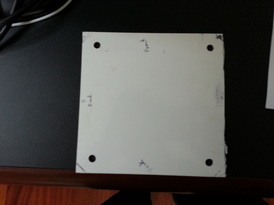
Note the above picture it appears that the base is identical. Be warned its not quite identical. There is a little bit of extra fibreglass you need to trim off on 3 sides (about an 1/8 of an inch). You will also need to drill your own holes for mounting. Being anal about this stuff I created my own little template out of thin starboard (see picture below). I will bring it to the rendevous at Pt. Browning if anyone wants to borrow it. A last note... because the new muffler is roughly 3 inches taller than the old one you can simple cut off the existing hoses rather than struggling with baked on stuff. A good thing for me since my exhause hoses were not that old. 
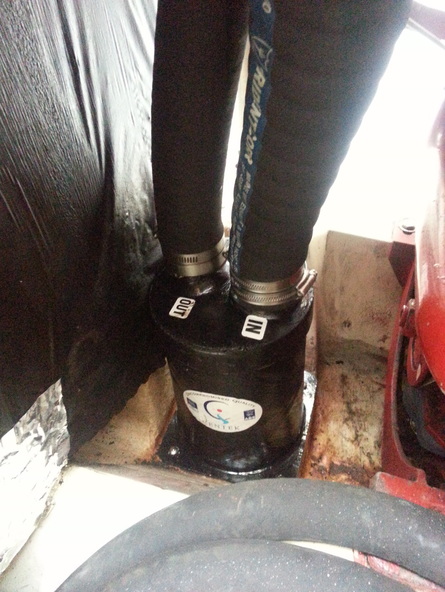
But, does it fit in the boat? The photo below shows the completed installation. Next Week .... on to the Second thing - The new Engine Mounts for the Westerbeke 33.
I have to admit I overthought this one a bit. I was intimidated by everyone elses tales of woe and by the challenge of trying to lift up the aft end of the engine next to the muffler. I was also somewhat befuddled by the need of Westerbeke to create a mount that was upside down in addition to being inaccessible. Of course one could argue it is upside down and backwards given the orientation of the engine itself. Anyway this story coming up next week. Also upcoming, stories of Ecuador (on a boat), and a short trip (by a big boat) over to Port Townsend.
3 Comments
So finally.... after much trepidation I got around to writing this... Mostly it was held up by the lack of a calm day to raise the Main Sail to get pictures while tied to the wharf. But I admit I did also procrastinate, and golf, travel, sail etc, but I digress. To Begin, Summer Snow's current Single LIne Reefing system came about when I added new sails in 2012. At that time I had Alex Fox from Trotac (then at Quantum) and Brent Jacobi (Blackline) recommend how to deal with reefing because the new Main is both deeper and roachier than the standard Main. But first lets start with the single line reef system. Figure 1 below shows a typical single line reefing system for the first reef in a main. The final configuration from Summer Snow differs from this configuration in a couple of way that may seem picky at first blush, but are actually important changes to reduce stress on the mast,sail, boom and lines. Firstly, I modified the fairlead on the mast.... after pulling a block off the mast. It turns out that if you set it up like figure 1 above the reef line is tight on one tack, and then you tack over... you overload the line, the fairlead and the entire system. I now have a fairlead at the aft part of mast which leads the reef line directly to a block that swivels at the base of the mast. Does not matter which tack you are on. Secondly, I run the single line reefs to the end of the boom so that they act as effect outhauls as well as reefs for each reef point. Thirdly, I added a light weigh block to the tack of the reefs fitted to the reef cringle so that the line runs free and easy. Fourth, I put in a tough luff with low friction cars at the mast so the sail drops quickly and easily to the reef point. Finally, I improved the lazy jacks to cradle the sail so I usually don't have to use reef ties. See figure two below. As you can see the changes are small but they result in a much more effective system that is fast, reliable, and effective. One last important thing I did was to switch to high strength thinner line which also adds to the efficiency of the blocks. After tweaking this system over 2 years I think I now have it to a point where I don't have to leave the cockpit to quickly reef early and reef often. It keeps Gail happy and the boat sailing flat and fast. The following pictures show the various aspect of the system beginning with a picture from the port side of both the first and second reefs with the lazy jacks deployed. The image above shows the entire system at the tack end of the sail you can see the lightweight block at the top left with the second reef run through. At the clew you see both the first and second reefs coming from the aft end of the boom to the cringles and then back down to the boom aft of the cringles so the reef lines act as outhauls on the sail once the reef is in. The retractable jack lines catch and control the sail minimizing the need for reef ties. Below is a close up of the light weight low friction block. Reducing of the friction on the lines is crucial as is increasing the ease with which the sail can be lowered. Below is a close up of the teflon luff (could be Harken Battcar, Tuff Luff or Strong Track) and slide at the Batten with integrated swivel to allow the sail to flake easily. Regardless of what slide system is chosen... its important realize that you will need to either revamp your existing mainsail or wait as I did until you are purchasing a new Mainsail and incorporate it into the design and delivery. Below is an image of the 1st reef at the tack showing, the exit from the boom using the existing sheave, the lightweight block on the sail and the fairlead on the aft of the mast (slightly obscured by the retracted jacklines. Note that I left the horns on the boom so I can use them with the 3rd reef (in case hell ever freezes over.... or I go offshore). The following image is a view on the port side of the 2 reef from the fairlead down to the block at the base of the mast. The reef line is blue with yellow flecks. The block at the base of the mast is a shaeffer double ball bearing block. The whole thing is a bit over engineered. In keeping with the whole concept of a CS36T. The next image is a view of the clew end of the 1st reef. Here you can see the reef line exiting the sheave at the aft end of the boom then running up to the aft cringle and then down to boom. You can see from the line angles that this gives an effective reef and outhaul. Thats the end of the images and my simple description of the implementation on Summer Snow. As a final comment, I would like to make it clear that a better reefing system was crucial after I increased the sail area of the mainsail. Instead of reefing at 18 knots I now reef at 16 knots, which means I do the first reef quite often. The plus side is that with the bigger Main and Genoa I am sailing when a lot of other people are motoring. I would rather be sailing so I will take the slight increase in work as a trade off to less engine noise. Of course it took planning on my part and good execution from the sail maker and the rigger but the result was better overall performance of the boat with added safety for the crew. Its all good.
Well the 2015 Fall Rendezvous was definitely exciting! Summer Snow had a spectacular sail through satellite channel, Sansum Narrows and then all the way to Telegraph Harbour in the sunshine, with a rising following breeze and tide in our favour. Then we all got to experience 63 knot gusts at the dock on Saturday accompanied by rain, hail and bursts of sunshine. But of course one of the highlights was the tournament of the Underhanded Game..... I speak of course of the annual Bocce tournament. The most consistent rule in Bocce is that the ball must be bowled or thrown underhand as shown below by Jeff. ![]() However, in this underhanded contest many other rules and guidelines vary..... so I undertook to find out if there were in fact one set of rules. But before exploring the rules, some history. The word “bocce” is a plural of the word “boccia” meaning ball in Italian. "Volo," as it is also called by the Italians, derives it’s name from the Italian verb “volare,” meaning “to fly” and refers to the manner of throwing a ball through the air in the attempt of striking away an opponents ball. The French refer to the sport as "Boule Lyonnaise." With this info as background, and armed with the experience of playing the underhanded game with many different rules I began to investigate just how many "Official" sets of rules there may be. Quite a task.... which I subsequently abandoned! Apparently there are as many rules as their are associations who play the game. However, what I did find is that there are at least 5 main types of Bocce (thats excluding variants that are actually Boules or lawn bowling or some other thing). These are 1. Indoor Bocce (with a defined court, 2. Outdoor Bocce (with a defined court or playing surface (see below). Geometry of a formal Bocce True bocce courts correlate to the ancient "golden ratio"a.k.a"Phi" = 1.6 = 8 / 5 = : Court length = 27.50 m, maximum width = 4 m, K = (27.5 / 4) = 6.8534, which is exactly . For the minimum width = 2.5 m, the ratio is K = (27.5 / 2.5) = 11, i.e. . The ratio between minimum and maximum width is 4 / 2.5 = 8 / 5 = 1.6 = . 3. Outdoor Bocce with a playing surface defined by ropes (flexible), 4. Beach Bocce, and 5. a version that is similar to Boules in that you do not define a playing area but instead restart the game in a 1 metre circle positioned around the former location of the Jack or Palino. In each case there can be 3 types of Bocce played (Punto, Raffa, Volo) or some combination thereof.... Punto is complicated.... All the collisions of balls are valid unless any ball travels more than 70 cm... then they are not). Volo is high tosses where you have to call the target and you must land within .5 metres of the target before striking it. In Raffa the ball is tossed a minimum distance and then rolls to a called target where it must land within 13 cm of the target ). Yes really.... but most people don't seem to follow the rules unless its an official tournament where the rules are serious. I especially liked the rules of the The Memphis Italian-American Society and Bocce Club rules and regulations which were defined in the 1870’s. They basically stated they did not like the stringent rules and made up their own. I believe the CSWest club should continue in this tradition. A couple of interesting potential additions to our current rules follow.... Leaners Etc: In some rules there are extra points awarded for balls that are touching the Pallino, in some cases 2 points in another case a ball touching the Pallino is worth 5 points, a ball within a ball diameter but not touching is worth 3 points and all other balls are worth 1. If both teams have a ball touching the Pallino then no points are awarded or maybe they are. s See http://www.beachbocce.com/rules/. The Yellow Card: There were some folks who laughed when I thought Keith should get a yellow card but .... In Bocce you can get yellow carded for kicking any ball... if you get 2 yellow cards in a match you are red carded and ejected.... you then lose your balls. See http://www.boccevolo.com/about/ch4.html. The Fanny Award: "Fanny" began on the "plateau de la Croix-Rousse" between 1860 et 1870 in Lyon, France. She was not known as a player, but rather a girl who would expose her backside to the losers of the match. The losers would then be obliged to kiss it in defeat! Today it is common for clubs to have a picture or sculpture of Fanny (see below), thus providing something to kiss for anyone who loses without scoring a single point. I believe this may have happened in this years tournament. So that brings us to an end ..... of another blog.... But I leave you all with a question. If the spectators of the game are struck by lightning because they are standing under a tree in a thunderstorm.... Do we call the game of Bocce or continue to play.
![]() Well, Summer Snow has just completed another epic journey to Desolation Sound and this time ... instead of just fun and frivolity... the crew of Summer Snow conducted some empirical research. This research program came about as a result of our heated technical discussions about Anchors several rendezvous ago! Which anchor? How Big? etc etc. Bruce Anchors seemed to get a lot of positive press so I decided to relegate my CQR to the lazaretto and replaced it with my "spare" Bruce and put together a list of anchorages to try it out. Summer Snow departed on a smoky summer day in a nice breeze and her first target was Montague harbour. This location has been the site of many multiple tries with the CQR. So how did the Bruce fair? It hooked, it held and it even withstood the Norm test (full speed astern - 3 times). We had to drag it out of the mud with the engine to leave in the morning! To summarize... this test continued on mud, gravel, rock and kelp bottoms... the result was always the same. The Bruce hit first time, every time and more importantly never dragged. It held in some pretty stiff gusts in Pendrel (29 Knots). It didn't matter if we dropped carefully and backed away, fished for bottom (with about 35 feet out) bow first or fish for bottom in reverse to stern tie. So far I am 16 for 16. Not fully scientific, but methodical and for me convincing. I think the Bruce will now have a permanent place on the Bow, and the CQR... well it balances out the battery bank. |
AuthorHenry Kucera is the Captain of Summer Snow a CS 36 Traditional. Archives
May 2016
Categories |